Offset Vectors
Selected vectors (open or closed) can be offset either inwards or outwards to create new vector shapes that might be useful for edge patterns or borders etc. To offset a vector shape, use the following steps:
- Select the vectors to offset
- Select the required direction - Outwards / Right or Inwards / Left
- Enter the Distance
- Click the button
Options
The offsetting options are slightly different in their behavior depending on whether the vector to be offset is open or closed. See below for more information.
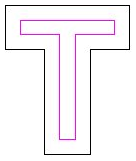
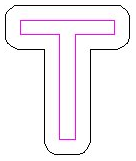
Create sharp offset corners
Will retain any sharp corners in a design.

Offset with Sharp Corners on

Offset with Sharp Corners off
Offsetting Open Vectors
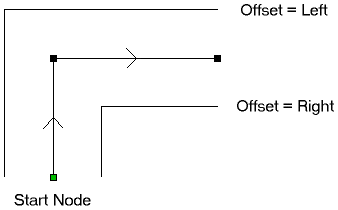
When offsetting open shapes, the options are either to the Right or Left side of the selection. The direction of open vector(s) is very important as this is used to decide the right and left side of the selection. Selecting Node Edit mode (pressing N on the keyboard) will display a Green node at the start of the vector. Looking along the vector(s) from the green node indicates the direction and the image below shows offsets to the left and right of an open vector.

Notes
Square Offsetting a very acute (included) angled sharp corner will result in the corner point being positioned a long way from the original geometry, often off the material or cutting through other shapes in the design. To stop this happening Cut2D Pro checks that the distance for the new calculated offset point is less than 5 x the offset distance away from the original corner point.